The first one we are going to study is the Scotch Game. As you will soon see for yourself, it leads to an intricate and interesting game. This opening has been heavily explored by none other than the legendary World Champion Garry Kasparov.
Kasparov often employed this opening as his “secret weapon” against 1…e5. He mainly used it as an alternative to the Ruy López – the most popular opening with 1.e4 e5 in top-level chess games.
If you can’t wait to learn all about the Scotch Game, grab your chess board and let’s get started!
How does the Scotch Game happen on the chess board?
First of all, let’s take a look at the moves that lead to the Scotch Game. You already know the first one made by both White and Black – it goes like this:
- e4 e5
- Nf3 Nc6
- d4
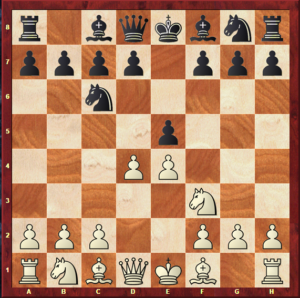
As you can see from diagram 1a, the Scotch Game is characterized by White pushing d2-d4 on his third move, instead of developing the King’s Bishop, as is more common in other open games’ openings.
Knowing how to reach this position is the first step towards becoming a Scotch Game master. However, above all, there is one question you must ask yourself, and it is why you should choose this opening over a different one.
Why play the Scotch Game?
There are various reasons that can lead a player to choosing a certain opening above others. One of them is, of course, particular taste, and preferred style over the board.
For instance, a solid and strategic player who prefers slow-paced games might opt for 1.d4. A highly creative and tactical chess player will most certainly feel inclined towards 1.e4.
With the Black pieces, since you don’t have the first move, you don’t have the opportunity to shape the character of the game as much as White does. If you are playing with the Black pieces and face 1.e4, replying symmetrically with 1…e5 is one of the most popular options, and the one that is said to represent the clearest path for achieving equality.
If you have the White pieces and decide to start with 1.e4, what to play against 1…e5 is one of the most important decisions you will make.
Here is why the Scotch Game may be a good option for you:
- White’s idea behind playing d2-d4 from early on is to achieve harmonious development and take control over the centre;
- It offers logical and natural development of the pieces, and many chances to grab an advantage from early on without having to memorize long lines;
- The Scotch Opening does not have as much opening theory as the Ruy López or the Italian Game;
- Being less played, it is more likely to find unprepared opponents – this opening is often neglected by 1…e5 players who believe they will find other openings in the great majority of their games;
If you are already convinced that the Scotch Game might bring some joy to your chess, let’s start looking at its variations in order to learn how to play it.
How does Black reply to 3.d4?
After the introductory moves of the Scotch Game:
- e4 e5
- Nf3 Nc6
- d4
Black’s main move and the only one you should consider is to take on d4 immediately, as shown by diagram 1b.
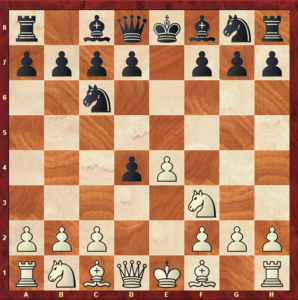
This move is the only one that makes sense in this position. As mentioned in the previous section, White’s idea by playing d2-d4 is to achieve full central control from early on.
If Black replies in a passive way and does not take this pawn immediately, White may have the chance to push d4-d5 or play dxe5 and establish a great control of the central squares, while also gaining a lot of space.
For instance, if Black plays a move like d7-d6 – seemingly supporting the e5 pawn, White can choose between d4-d5 or dxe5 in order to claim an advantage:
- d4 d6
- d5 Ne7
- c4
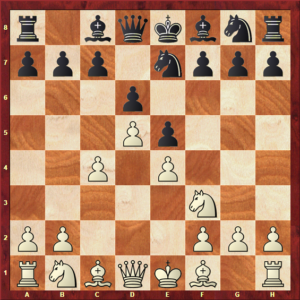
As you can see, this position is far easier to play with the White pieces. The central pawns are well-supported and grant White a very comfortable spatial advantage.
Another way of playing is to open up the centre with 4.dxe5.
- d4 d6
- dxe5 dxe5
- Qxd8+ Kxd8
- Bc4
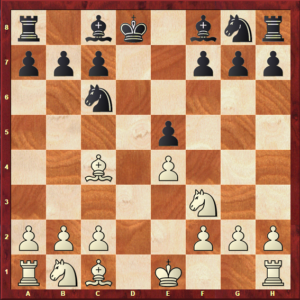
Despite having lost the central control, White has achieved something equally significant: Black’s King is now misplaced and has lost the right to castle. White is further ahead in development and has an advantageous position. You may think that this position has a tendency for being drawish just because many pieces have been snapped off the board already. However, playing this with Black is a real challenge, because White will consistently try to find ways to put more pressure on the f7 pawn and attack the exposed King with his Rooks.
As you may conclude after seeing these variations, the truth is that 3…d6 is a playable move – but 3…exd4 is what you should be playing if you want to have real chances of fighting for the full point. Black must take on d4 in order to fight for the advantage and make life harder for White.
If you are planning on playing the Scotch Game with the White pieces, please note that playing 3…d6 is one of those imprecisions that many unprepared opponents will feel inclined to make – so you need to be ready to grab the advantage with precise play!
After the move 3…exd4, White has two main options, which we will now cover in detail:
- 4. Bc4 (The Scotch Gambit);
- 4. Nxd4 (main line).
4. Bc4 – The Scotch Gambit
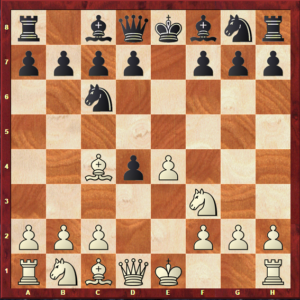
The Scotch Gambit is an element of surprise. Instead of taking back on d4, which, as we will soon see, is the most natural move in the position, White sacrifices a pawn. However, surprising your opponent is not the only aim of this gambit: there is clear logic behind it.
The idea behind giving away this pawn is to obtain rapid development and put immediate pressure on the f7 pawn.
White also has the idea of challenging Black’s pawn with c2-c3. This frees the d5 square for the Queen to join the attack, so Black must be careful and know what he is doing when facing this gambit.
There are three main replies for Black against this gambit, and we are going to see each of them separately.
- 4…Be7
- 4…Bc5
- 4…Nf6
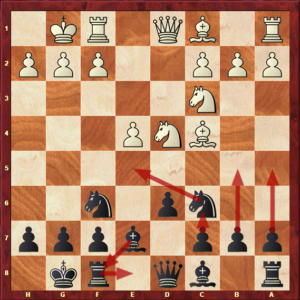
a) 4…Be7
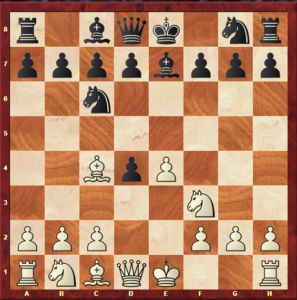
This is perhaps the quieter approach to the gambit. Certainly, many players who have never faced this line before will feel inclined to develop their pieces rather modestly, but with some harmony.
4…Be7 is a logical move, though it isn’t as ambitious as other alternatives.
White is faced with a choice here. He can opt to play 5.Nxd4, which will lead to a few moves such as:
- Nxd4 d6
- 0-0 Nf6
- Nc3
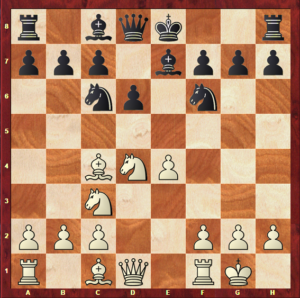
The material is even again in this position, and the pieces are naturally placed for both sides. However, White’s pieces are slightly more active here, due to Black’s Bishop on e7. This Bishop is restrained by the d-pawn and would rather stand on the much more active c5 square.
Here is a rough summary of how this position should be played:
White’s plans
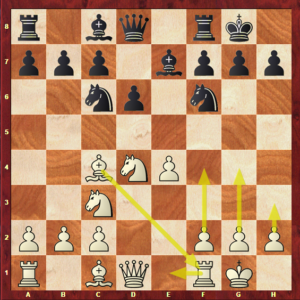
- Play h2-h3, to allow the dark-squared Bishop to be developed to the e3 square without being chased by Nf6-g4;
- Play Rf1-e1, freeing the f1 square for the c4 Bishop;
- Play f2-f4 and g2-g4, launching a Kingside attack. (Please note that although this plan may seem rather dangerous, White will be safe as long as he keeps his King on the h1 square, away from the a7-g1 diagonal that will open after the move f2-f4. Castling Queenside, which may seem like a tempting alternative in terms of attacking, allows Black to find counterplay by attacking on that side of the board himself, with a6-b5.)
Black’s plans
- Place a Knight on e5, allowing the c-pawn to move to c6 and attacking the c4 Bishop with b5
- Play c6-b5 and proceed to expand on the Queenside. This makes sense since many of White’s pieces are placed there, and Black wants to gain space and tempi on these pieces;
- Play Rf8-e8 in order to free the f8 square for the dark-squared Bishop, from where it can effectively protect the g7-square and, in consequence, Black’s King.
b) 4…Bc5
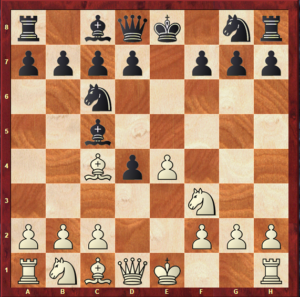
If the previous variation was the quieter approach, this one can be considered to be the most ambitious reply to the gambit, aiming to fight fire with fire. The development of the Bishop to c5 is certainly natural.
However, you must keep one thing in mind: if your goal is to play this variation, you should be well-prepared in the Italian Game. Not only the Bishops on c4 and c5 resemble these positions, but also most of these lines end up directly transposing into this opening.
This is one of the aces you can have up your sleeve playing White. If you are well-prepared in both the Scotch Game and the Italian Game, you may try to swing your opponent between these two openings and catch him underprepared.
Normally, a direct transposition to the main line of the Italian Game follows, after the following moves:
- c3 Nf6
- cxd4 Bb4+
- Bd2
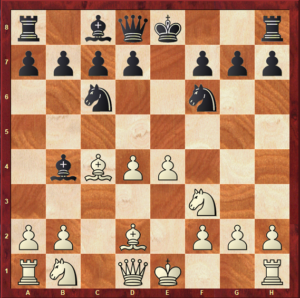
This position has been heavily studied by theoreticians all over the world. We will only provide a brief summary of plans for White and Black in this position, and leave an in-depth analysis on our article on the Italian Game.
White’s plans
- Play with the isolated Queen’s pawn and put pressure on the light squares with Qd1-b3;
- Control the open e-file;
- Avoid exchanging pieces and getting into an endgame.
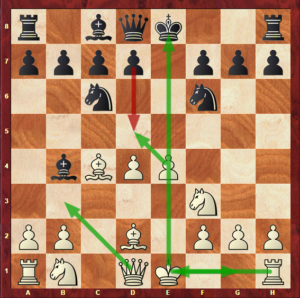
Black’s plans
- Play d7-d5 and attack White’s isolated pawn on d4
- Exchange pieces in order to reach an endgame in which the d4 pawn will reveal itself as a weakness;
- Play Nc6-a5 to attack White’s Bishop, forcing it to retreat and lose time.
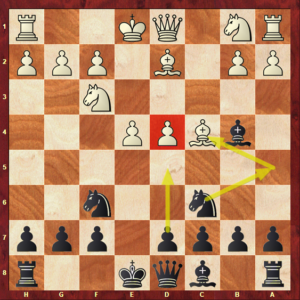
c) 4…Nf6
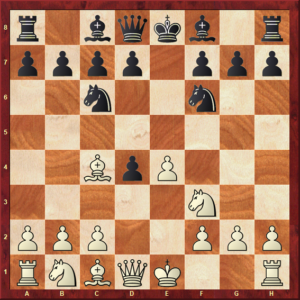
This is the most commonly played move in this position. By playing this move, Black understands that he might be, again, transposing into the Italian Game, this time into the Two Knights variation.
Usually, the move order that leads to this variation is the following:
- e4 e5
- Nf3 Nc6
- Bc4 Nf6
- d4 exd4
After White’s fourth move, you can see that the position is exactly the same as the one on diagram 1n.
There are two possible ways to continue for White in this position.
One of them is with the move 5.0-0, known as the Max Lange Attack. This is a logical move, aiming to safeguard the King. Play usually follows:
- 0-0 Nxe4
- Re1 d5
- Bxd5 Qxd5
- Nc3
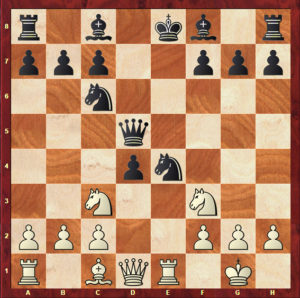
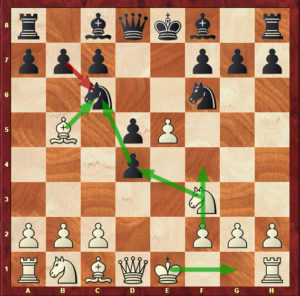
Diagram 1o portrays an exciting position, full of tactical ideas. White has sacrificed a piece, but the Knight on e4 is hopelessly lost, as it is pinned to the King by the e1 Rook. The Knight on c3 attacks both the Knight and the Queen. Once White regains the sacrificed piece, an even position will occur on the board, in which Black can easily equalize with precise play.
For this reason, White players of the Scotch Gambit have switched from the Max Lange Attack to the Dubois-Reti Variation, after the move 5.e5.
The reply that makes the most sense for Black is 5…d5, attacking White’s c4 Bishop in return and making way for the f8 Bishop to develop.
To 5…d5, White’s way of fighting for the advantage is by playing 6.Bb5. This move pins Black’s Knight and threatens to take on d4.
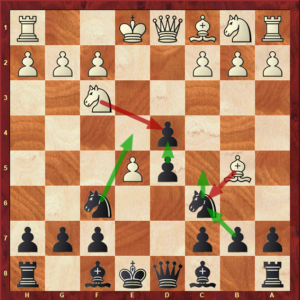
The position in diagram 1p is reached.
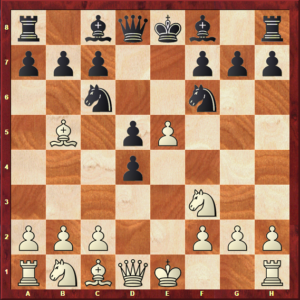
White’s plans
- Take the d4 pawn with the Knight and proceed to take on c6 to double Black’s pawns. White will have two pieces (Bb5 and Nd4) putting pressure on c6, so even if Black plays Bc8-d7, he can take the Knight and double the pawns;
- Expand on the Kingside with f2-f4, in order to protect the pawn on e5. White should place his King on h1 in order not to suffer threats along the a7-g1 diagonal.
Black’s plans
- Place a Knight on the e4 square. If White tries to chase the Knight away with f3, he will significantly expose his King. In addition to this, White wants to play f2-f4 to protect the e5 pawn;
- Expand on the Queenside with c6-c5, and in the center with d5-d4. These two ideas go hand in hand, and Black should choose this side of the board to expand since White is already further ahead on the other side, with the e5 pawn indicating the possibility of a Kingside attack.
4. Nxd4 – main line
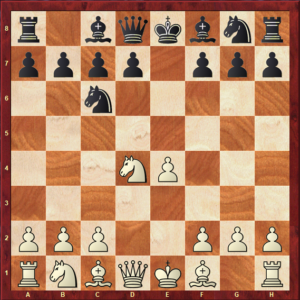
The position on diagram 1s is a world of possibilities. Certainly, by taking a good look at it, you will find that Black has many different development schemes for his pieces, and that’s absolutely correct.
There are three main variations for Black in this position, and we will now proceed to cover each of them in detail.
- 4…Qh4 (The Steinitz Variation);
- 4…Nf6 (The Schmidt Variation);
- 4…Bc5 (The Classical Variation);
a) 4…Qh4 (The Steinitz Variation)
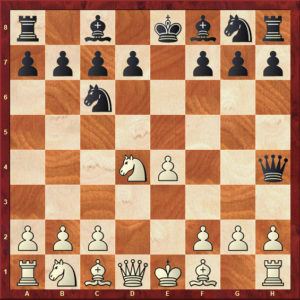
While this bold move may not be the most sound for Black, it definitely offers chances for interesting play. Players who like aggressive and double-edged games will feel at home in this variation.
The idea is to put pressure on e4, as after White plays Nc3 to defend it, Bb4 will challenge the protection of the pawn once more.
This is a variation in which White needs to be precise and know what he is doing. The main idea is to transfer a Knight (either the c3 or d4 Knight) to b5, from where it will put pressure on the c7 pawn. Please note that this pawn has been weakened by Black’s Queen early escape. But if White knows these ideas and plays them, the Steinitz Variation will lead him to a solid advantage.
The correct way to play for White is as follows:
- Nc3 Bb4
- Be2 Qxe4
- Ndb5 Bxc3+
- bxc3 Kd8
- 0-0
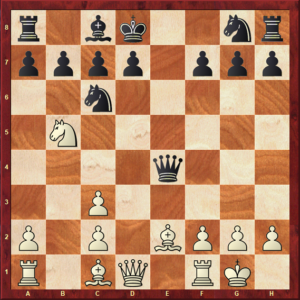
As you can see, this position is quite advantageous for White. His King is safe, while Black’s King is very exposed and has lost the right to castle. White also has the Bishop pair, and is further developed.
The only problem with White’s position are his doubled pawns; however, Black does not have a straightforward way to exploit this.
The comfortable advantage that White finds after a few moves is the reason why this variation is no longer very popular, especially at high level.
However, if you are planning on playing the Scotch Game with the White pieces, you will still find the funky 4…Qh4 in some of your games. Therefore, it is wise to summarize the plans for both sides in this variation.
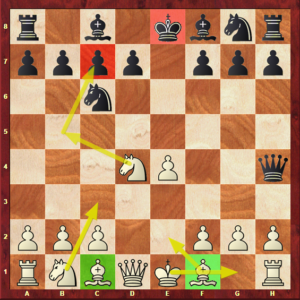
White’s plans
- Quickly develop the King’s Bishop and castle, bringing the King to safety;
- Transfer the d4 Knight to b5, in order to attack Black’s weakened c7 pawn and leave his King in the center of the board. Proceed to attack it using the Bishop pair.
Black’s plans
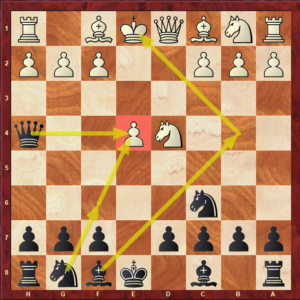
- Put pressure on the e4 pawn, using the h4 Queen and the dark-squared Bishop to pin the Knight on c3. Ng8-f6 is also possible, in order to increase the pressure;
b) 4…Nf6 (The Schmidt Variation)
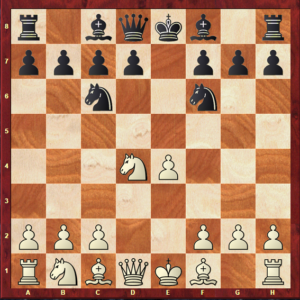
This is a very natural move: Black is developing a piece while attacking White’s central pawn. The fact that there is still a lot left to discover and explore about the theory in this variation has drawn many players all over the world to it, and it has definitely increased in popularity lately.
There are two equally important replies to this move for White:
b1) 5.Nc3 (Four Knights Game);
b2) 5.Nxc6 (Mieses Variation).
Let’s analyse each of them individually.
b1) 5.Nc3 (Four Knights Game)
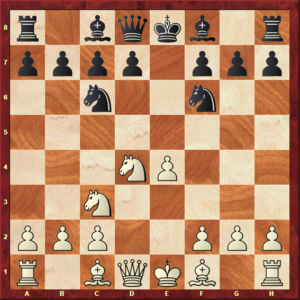
By playing Nb1-c3, White agrees to transpose into the Four Knights Game. Even though we will have an article dedicated to exploring this opening alone, we must still cover its main ideas and plans, as White can force a very direct and concrete transposition into it.
This variation has a reputation for being drawish, nowadays. Many pieces are often exchanged at an early stage, and Black achieves equality with concrete play.
White aims to develop rather effortlessly: light-squared Bishop to d3, eyeing Black’s King; dark-squared Bishop to g5, pinning Black’s Knight; and castling, in order to protect his own King.
Black must be slightly more energetic to claim equality. His main idea is to breakthrough in the center with d7-d5, because this move can seriously disturb the order of White’s pieces, and allow him to develop his own pieces, namely the c8-Bishop, more freely. Usually, this break will be supported by a pawn on c6, most likely after White takes Black’s Knight. Another important idea is to bring the dark-squared Bishop to b4, in order to pin White’s Knight on c3, a move that limits a piece of White’s (Nc3) while developing a Black piece.
Play usually follows:
- Nc3 Bb4
- Nxc6 bxc6
- Bd3 d5
- exd5 cxd5
- 0-0 0-0
- Bg5
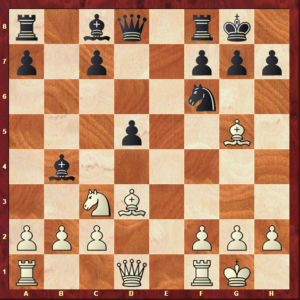
As you can tell, all of the moves leading to this position were rather forced, or too natural not to be made. White has taken the Knight on c6 in order to be able to develop his Bishop to d3, from where it protects the e4 pawn.
This is why many people tend to stay away from this variation, with both the White and the Black pieces: they believe it leads to a dull game.
While, to some extent, it is true that the position is equal, there are still asymmetries in the structure, and more than enough ways to play for a win.
Let’s briefly summarize the plans for each player in this variation.
White’s plans
- Develop the Bishop to d3, aiming, at some point, to start an attack with pieces on the Kingside;
- Develop the Bishop to g5, putting pressure on the f6 Knight, with Qd1-f3 as a natural follow-up. The idea is not to take the Knight, but to restrict Black’s pieces and ensure they are not active. If Black, for instance, retreats his Bishop to e7, he will be putting an active piece in an inactive place;
- Pressure Black’s central c6-d5 formation, with Rf1-d1 and possibly c2-c4.
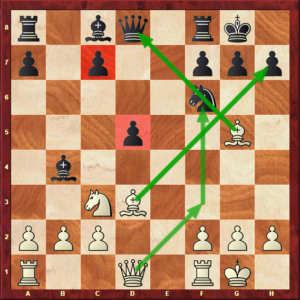
Black’s plans
- Play Bf8-b4 and put pressure on White’s c3 Knight;
- Breakthrough in the center with d7-d5, and aim to expand with c7-c5 and d5-d4 later;
- Place a Rook on the b-file and attack the b2 pawn.
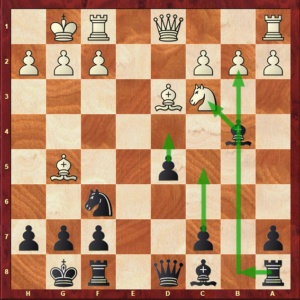
b2) 5.Nxc6 (Mieses Variation)
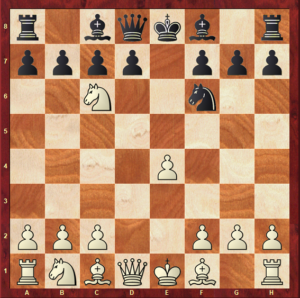
This is the most popular continuation for White against the move 4…Nf6. White chooses to play this intricate line over the Four Knights in order to catch Black by surprise and not allow him to go into the lines in which he is more prepared. In addition to this, White avoids the so-called dull and drawish variations we have just analysed in the previous section.
White’s idea behind taking the Knight on c6 is to be able to push e4-e5. This was not a possibility right ahead, as Black’s c6 Knight was protecting the e5 square.
After playing e4-e5, White wants to develop while harassing Black’s Knight and gaining tempi by forcing it to move.
In this variation, Black must be exceptionally prepared. The Mieses Variation requires memorization and accuracy. It leads to complications and sharp tactical lines, so only players who have carefully studied should play it in their games.
In nearly every game played in this variation, play goes as follows:
- Nxc6 bxc6
- e5 Qe7
- Qe2 Nd5
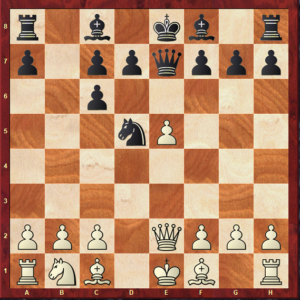
As you can tell, these moves are rather forced. Black plays Qd8-e7 to delay getting the Knight out of the attack for one more move. With this move, Black pins the e-pawn to the King. Therefore, White’s best attempt is to play Qd1-e2 himself, so that the pawn is no longer pinned and the Knight has to move – which he does, to the most natural square, the central d5.
A few moves further into the variation:
- c4 Ba6
- b3 g6
- f4
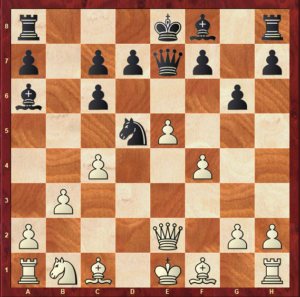
Black uses pins once more to delay the retreat of the Knight, this time with Bc8-a6. This is a clever idea, since it also develops a piece. After having moved the Queen to e7, it only makes sense for Black to play g6-Bg7, so that he does not have to waste another tempo moving the Queen away so that the Bishop can come out. It will be especially good for Black to have a Bishop in this diagonal once White has played b2-b3 to support the c4 pawn. The dark squares of the long diagonal are weakened.
On the other hand, by playing f2-f4, White has given the e5 pawn some great support. He has better control of the central squares and a space advantage, despite still having some development issues (for instance, the Bishop on f1).
It’s time to conclude what the plans are for both players in the Mieses Variation.
White’s plans
- Push e4-e5 in order to gain space in the center;
- Harass Black’s f6 Knight with e4-e5 and c2-c4;
- Support the center with f2-f4, and play for the spatial advantage.
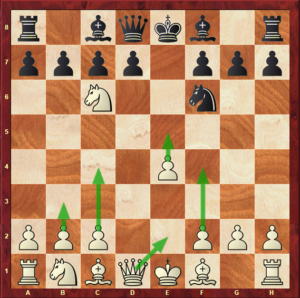
Black’s plans
- Use pins, such as Qd8-e7 and Bc8-a6, to achieve quick development and delay moving the attacked Knight;
- Play g6-Bg7 and proceed to pressure the weakened dark squares in White’s field;
- Play d7-d6 to challenge the center, also in combination with the Bishop on g7 to open up the long diagonal.
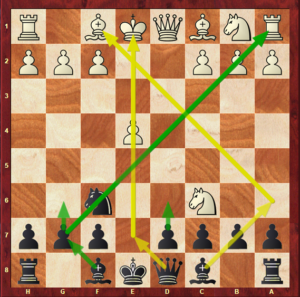
c) 4…Bc5 (The Classical Variation)
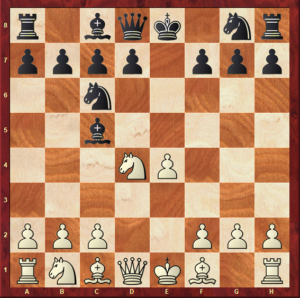
Even though the move 4…Nf6 has been increasing in popularity, the classical 4…Bc5 is still the most played in the Scotch Game.
Players with a classical formation and who do not wish to transpose to the Four Knights Variation or get into the complications of the Mieses Variation or the Steinitz Variation will certainly prefer this move.
This is a sensible move, as Black is developing a piece, preparing to castle, and putting pressure on White’s central Knight on d4.
After 4…Bc5, it is now White who is faced with a choice. How should he continue his development?
There are three different approaches he can use in this position to defend his central Knight:
c1) 5.Nxc6
c2) 5.Nb3
c3) 5.Be3
c1) 5.Nxc6
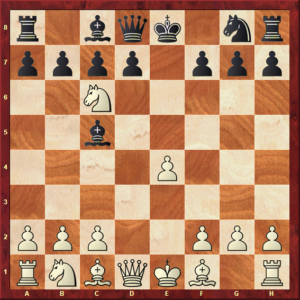
It certainly makes sense to exchange the Knight that is under fire for the one on c6, despite losing an important central piece. This way, White does not waste a tempo in defending or retreating it.
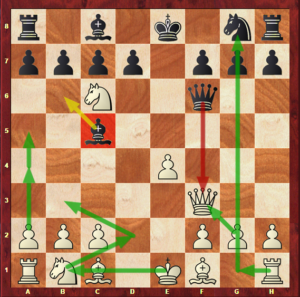
Instead of taking back directly on c6, Black has a clever idea of developing a piece first, with Qd8-f6. This move threatens mate on f2 and Black will recapture the Knight only one move later. If Black plays accurately, White will not be able to reach anything more than equality out of the opening stage.
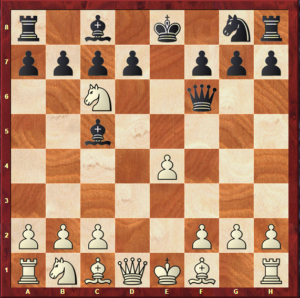
There are two effective ways for White to defend the threat of checkmate on f2. They are Qd1-d2 and Qd1-f3.
Qd1-d2 was the old main line, after which Black would recapture with the d-pawn on c6. It does not make a lot of sense to take with the b-pawn, as it won’t be so easy for Black to breakthrough in the center with d7-d5.
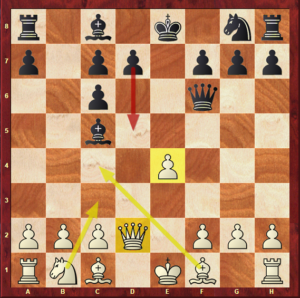
In addition to this, dxc6 opens up the way for a Rook to come to the d8 square and attack the Queen. Many players found the position on diagram 2l to be uncomfortable for White, as Black has easy development.
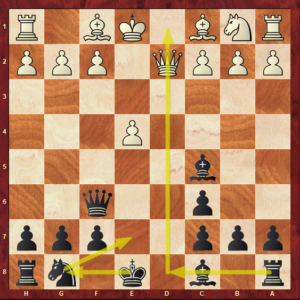
For this reason, Qd1-f3 has increased in popularity. Against this move, Black usually takes with the b-pawn, as it is now a lot easier to play for d7-d5, since the Queen has moved out of the d-file.
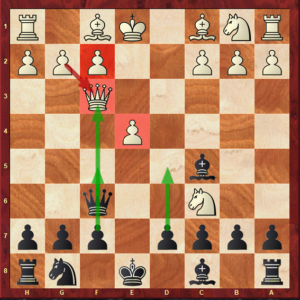
It is not a great idea for Black to exchange Queens on f3. Despite doubling his pawns, White gets a great control of the g-file, and has the possibility of heavily attacking the g7 pawn.
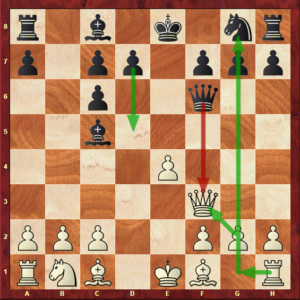
Play usually follows:
- Qf3 bxc6
- Nd2 d6
- Nb3 Bb6
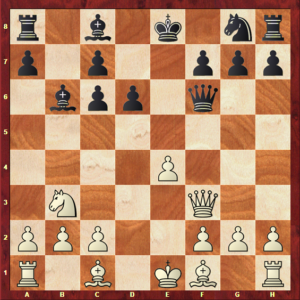
White places the Knight on b3 because it perfectly limits Black’s Bishop on b6, by attacking the a5 and c5 squares. It also makes way for White to develop with Bc1-d2, aimed at the idea of Bd2-c3 attacking the Queen, and chase Black’s Bishop with a2-a4, in order to gain space on the Queenside. If Black exchanges Queens, White will place a Rook on g1 and castle Queenside.
On the other hand, Black will strive for a breakthrough, with either d6-d5 or f7-f5, to challenge White’s center. Black should carefully choose between those moves by analyzing the placement of his pieces: in order to play f7-f5, he must be castled and have a Rook on the f-file. In order to play d7-d5, he should have a Rook on d8 and his Bishop on b7.
Briefly concluding, these are the plans for both sides in the 5.Nxc6 line:
White’s plans
- Place a Queen on f3. If Black ever exchanges Queens, play Rh1-g1 and castle Queenside;
- Develop naturally, with Nb1-d2, and chase Black’s c5 Bishop with Nd2-b3 and a2-a4.
Black’s plans
- Challenge White’s central position with d7-d5 or f7-f5;
- Exchange Queens and put pressure on the doubled f2 and f3 pawns.
c2) 5.Nb3
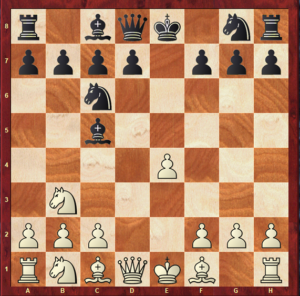
This is perhaps the most logical move: instead of losing a tempo, White wins one by attacking Black’s Bishop and forcing it to retreat. Black usually replies by retreating the Bishop to b6, as it is the only available square to keep pressuring the center and the f2 pawn.
Play in this variation usually goes:
- Nb3 Bb6
- Nc3 Nf6
- Qe2 d6
- Be3
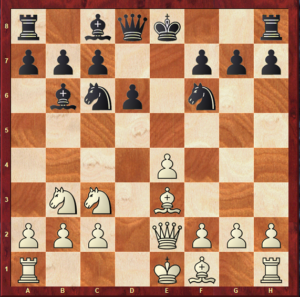
The flexibility of this variation is what has made it grow in popularity over the past few years. As you can see, the position in the above diagram does not have a fixed structure, and both White and Black are well-developed and have the possibility of choosing from a great variety of plans and ideas.
The most common of them are the following:
White’s plans
- Castle Queenside and support the central pawn with f2-f3. White would lose too much time taking the Queen and the light-squared Bishop away in order to castle Kingside;
- Developing the light-squared Bishop with g3-Bg2, since the Queen is preventing the Bishop from moving along the f1-a6 diagonal;
- Chase Black’s Bishop with a4-a5, mostly to gain a space advantage on the Queenside.
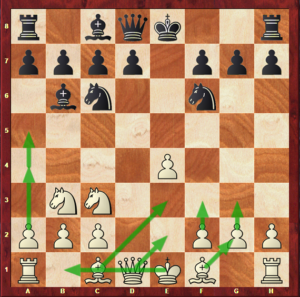
Black’s plans
- Castle either Queenside or Kingside and establish a strong center with d7-d6;
- Pressure White’s e4 pawn using the semi-open e-file;
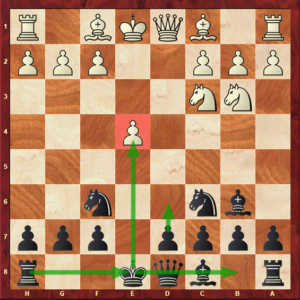
c3) 5.Be3
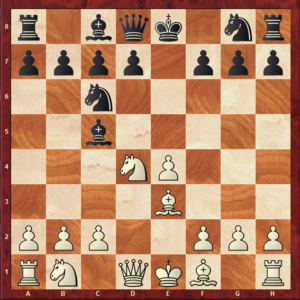
This is the historical main line in the Scotch.
This move makes a lot of sense: if White’s Knight is so well-placed, why should he retreat it or take Black’s Knight? Perhaps, it is more logical to support it and allow it to remain in its central position.
In addition to this, this move threatens Nxc6 (attacking the Queen) followed by Bxc5 – which forces Black to reply by increasing the central pressure with Qd8-f6, instead of leaving the f6 square for the Knight. With this move, Nxc6 no longer attacks the Queen, and Black will be able to reply with Bxe3 in return.
For this reason, and because the Knight is attacked once more, White pushes c2-c3 to stabilize the Knight – again, White does not want to retreat or exchange it, but leave it fully supported in the center.
Play usually follows:
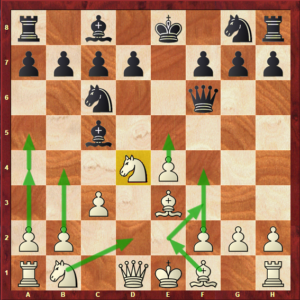
- Be3 Qf6
- c3 Nge7
- Bc4 Ne5
- Be2 Qg6
- 0-0
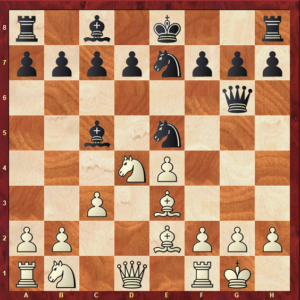
White’s idea is simply to give as much support to the d4 Knight as possible. Then, he might choose between expanding on the Kingside with f2-f4, a move which forces Black’s Knight to move away, or expanding on the Queenside by chasing Black’s Bishop with Nb1-d2, b2-b4 and a2-a4-a5.
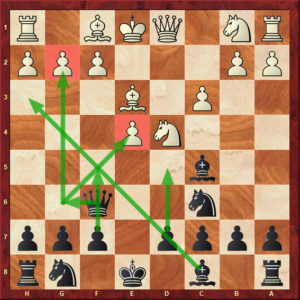
At the same time, Black also has clear goals in this position. The idea is to target White’s e4 and g2 pawns with the Queen on g6, and the threat of the Bishop coming into h3. He will proceed to castle short and breakthrough in the center with f7-f5 or d7-d5. If White is not careful, he might find himself in trouble once the strong e4 pawn is challenged.
These are the main ideas you should keep in mind when playing this variation:
White’s plans
- Support the central d4 Knight with c2-c3;
- Expand on the Kingside in order to gain a spatial advantage, with f2-f4, perhaps followed by Be2-f3 and e4-e5. This can happen while simultaneously expanding on the Queenside;
- Expand on the Queenside in order to gain a spatial advantage and force the c5 Bishop to retreat, with Nb1-d2, b2-b4 and a2-a4-a5. This can happen while simultaneously expanding on the Kingside;
Black’s plans
- Pressure White’s e4 and g2 pawns with Qf6-g6 and Bc8-h3, since the g2 pawn will be pinned once White’s King is castled on g1;
- Breakthrough in the center with d7-d5 or on the Kingside with f7-f5, aiming to destabilize White’s central control. Black will choose between these two options depending on the position. For each move, he must have a Rook behind the pawn: a Rook on f8 for f7-f5, and a Rook on d8 for d7-d5.
Summary
The Scotch Game is often neglected by 1…e5 players who know that they will face the Ruy López or the Italian in most of their games, as those two openings are the most widely played in chess.
However, this is not the attitude you should have if you want to become a master of the open games – so, as not to be unpleasantly surprised, make sure to take a good look at Garry Kasparov’s favourite weapon.
This article has presented you with a detailed overview of all the important variations in the Scotch Game – you are now ready to make this opening a part of your repertoire, and have successful results with it!
Let’s briefly summarize the general plans and ideas for both players in the Scotch Game.
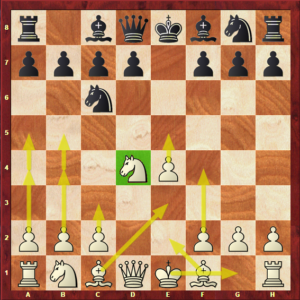
White’s plans
White’s plans are to control the center from early on, and develop his pieces to natural squares. In the main line of the Scotch, the idea is to support the central Knight as much as possible, and only then proceed with other plans, which may include Kingside or Queenside attacks.
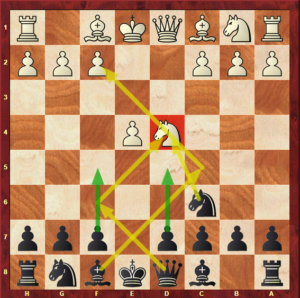
Black’s plans
Black’s plans are to pressure White’s center with Bc5 and Qf6, and then proceed with natural development by castling short. Black will be looking to breakthrough in the center and disconnect White’s pieces.
We hope that this article has been of great use to you, and that you now feel confident and ready to employ this weapon in your chess games. Make sure to check out our other articles on the open games to become a master of chess openings in no time!
Reference : simplify chess dot com , google, chess dot com, Wikipedia, etc.


No comments:
Post a Comment